
Understand that drawing is as much a mental activity as a mechanical one.
Alphonso Dunn
Spontaneity versus reflection
There’s always a sweet spot between thinking about something and doing something. That sweet spot will vary from person to person, too. Rushing in too early can lead to mistakes. Whereas overthinking can paralyse you.
A bit of spontaneity in what you do can make it more fun, after all.
However, when it comes to sketching, I think it’s too tempting to jump in right away without thinking about it. This is why I’ve started this post with the quote from Dunn’s book about drawing in ink.
Question
Before you begin sketching, I think it’s always useful to ask yourself a few key questions before you put pen to paper. This is especially important when using ink, which is far less forgiving when you make mistakes compared to using a pencil.
Questions to ask before you begin:
- What sketching techniques can I employ to emulate the various people and objects in the picture?
- Where is the light coming from and, consequently, where is the shadow?
- How can I experiment without spoiling the picture?
Let’s take each of these questions in turn and discuss why they’re important.
Sketching techniques
Dunn (2015) covers a number of techniques in his book, from various types of hatching to stippling. I’ve covered hatching in a previous post, but I just wanted to flag Marc Kompaneyets‘s video too, where he covers cross contour hatching in a bit more detail, describing three main subtypes (curly, thick-thin, and chisel hatching).
You can see all three of these subtypes demonstrated in the image below.
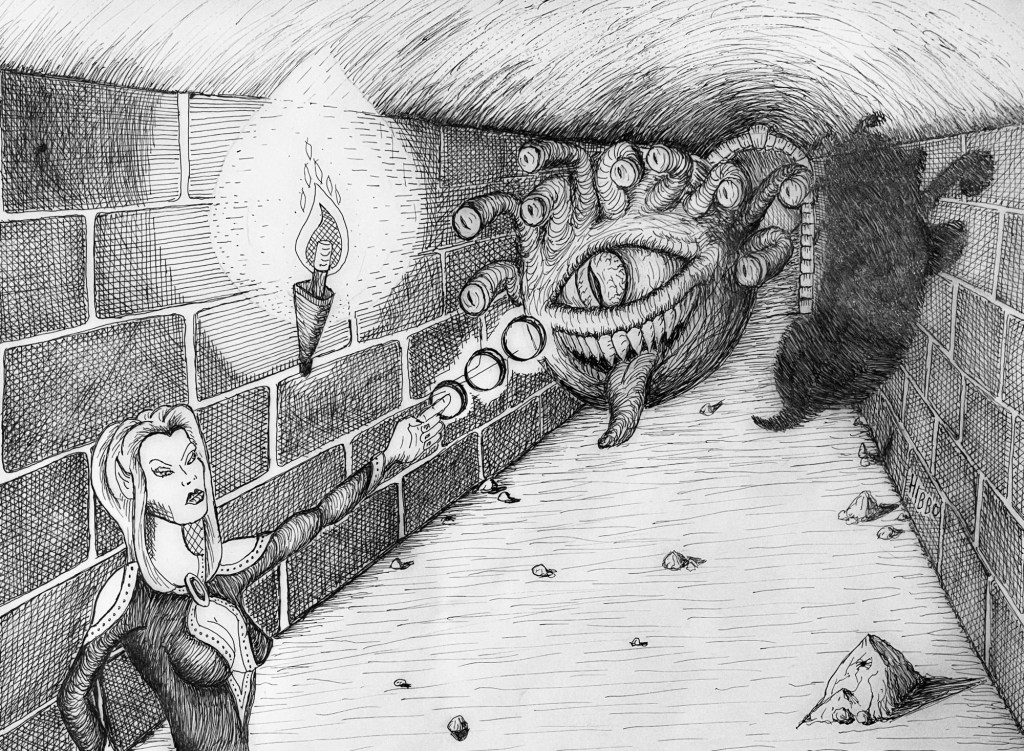
Curly
Curly hatching is used on the female figure at the forefront of the picture and on the beholder. I love this type of hatching and it’s a particular useful technique to apply if you want to create the illusion of depth.
Thick-Thin
This involves applying pressure to the pen to create a thick line and then releasing the pressure so the stroke tapers off into a thinner line. You can see this technique applied to the ceiling and is particularly effective for making certain parts of the picture appear to be in more shadow than others.
Chisel
Hatching involves a steady hand – the longer the lines the harder it is to maintain a true stroke with the pen. As a relative newcomer to sketching, I struggle with this. It’s worth considering whether shorter strokes would work just as well, that don’t require as much of a steady hand. I’ve used the technique on the floor and on some of the stonework, where shorter strokes work just as well as long ones.
Light
Before drawing, consider where the light is coming from in the picture. to a large extent this will determine what kind of hatching you need to do on the parts of the picture that are in light and shadow, It will also determine what kind of shadow you need to include, based on where the main objects are in the picture in relation to the light source.
In the image above the light source is a simple torch flickering on the wall. I’ve deliberately placed it there because it allows me to create a menacing shadow behind the beholder, that makes the monster even more menacing.
Experiment
Finally, you have to experiment. It’s how you learn what works and what doesn’t. But how do you experiment when using pen without ruining your picture?
Simple – and this is a bit of a cheat. I always make a copy of my master by tracing around the main sections and experiment on the copy. That makes it easy for me to see whether a particular technique works well or not. If it doesn’t, that’s fine, I simply don’t do it on the master!
References
Dunn, A (2015). Pen and ink drawing – a simple guide. New Jersey: Three Minds Press.
